Easy DIY Bubbling Cauldron
✨ Learn how to make an EASY DIY bubble cauldron and elevate your Halloween décor! 🔮
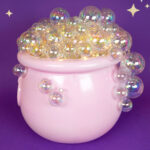
Ingredients
- Plastic Cauldron, 10-20" in height
- Spray Paint, optional
- Iridescent Ball Ornaments, various sizes
- Hot Glue Gun & Glue Sticks
- Recycled Packing Material, etc.
Instructions
- If you do not wish to keep your cauldron black, start by spray painting it in your color of choice and allowing it to dry completely.
- Fill your cauldron with recyclable materials until it is filled to within 1″ of the top of the cauldron’s interior. It does not need to be solidly filled – just filled enough that ornaments can’t slip past the filling and down inside the cauldron.
- Remove the wire hangers from the ornaments. Use the hot glue gun to attach the 2.5″ ornaments to the top of your cauldron filler.
- Add additional layers of ornaments in both sizes to build up the cauldron’s appearance of bubbling. Be sure to place the bubbles around the rim of the cauldron and in a cascade down one side. Add a few extra small “bubbles” to the front and sides of your cauldron.
- Weave the string of lights in between and all around the bubbles to illuminate them. If necessary, use a wooden skewer to help you push the light cording down in between the bubbles.
Notes
If you want the cords of your fairy lights to be completely hidden within the cauldron’s bubbles, weave the strand of lights throughout the ornaments as you glue down each bubble layer, rather than adding them after all layers are in place.